UPSC OTR: One Time Registration Process
The UPSC OTR (One Time Registration) system is a user-friendly platform introduced by the Union Public Service Commission to simplify the application process for various examinations, including the prestigious Civil Services Examination. This single-step registration ensures that candidates only need to fill in their details once, which will be automatically populated in future applications, saving time and reducing errors.
UPSC Notification 2025 Key details
UPSC New Registration Process 2025
Step-by-Step Guide to UPSC OTR Registration
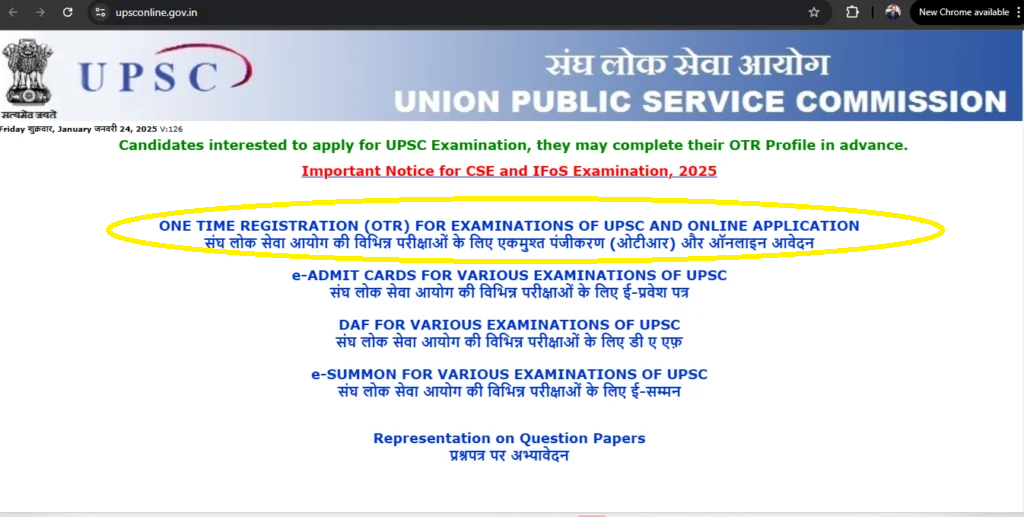
Step 1: Visit the Official UPSC Website
Go to the official UPSC website: https://upsconline.gov.in.
On the homepage, locate the One Time Registration (OTR) section for examinations.
Click on the provided link to access the UPSC OTR Portal or directly visit: https://upsconline.gov.in/upsc/OTRP/
Once on the OTR page, click the "New Registration" button to start the process.
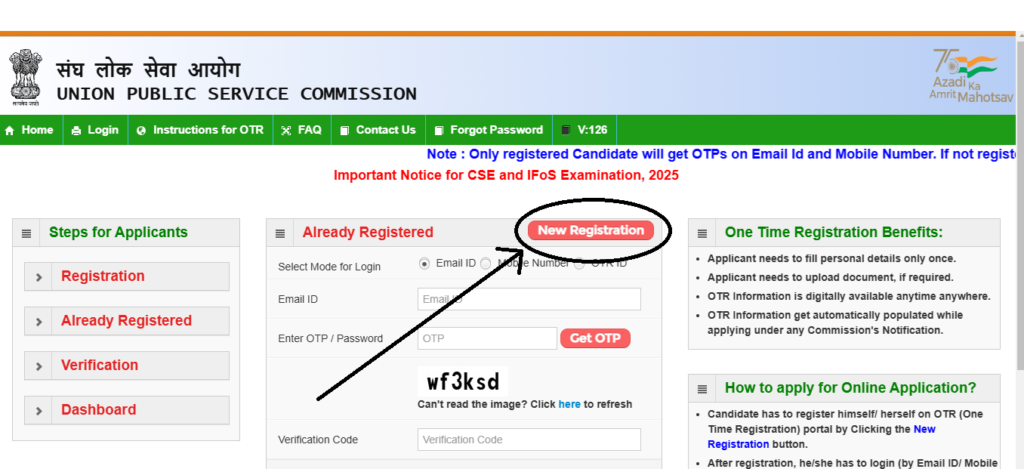
Step 2: Register Yourself on the UPSC OTR Portal
- Visit the official UPSC OTR portal at https://upsconline.gov.in/upsc/OTRP/
- On the homepage, click on "New Registration" to begin your registration process.
Fill in Personal Details
- Enter your name exactly as it appears on your Class X certificate and verify it.
- Select your gender and verify the selection.
- Provide your date of birth and confirm its accuracy.
- Fill in your father's name and mother's name, ensuring both are correctly entered.
- Specify your minority status, if applicable.
- Enter a valid mobile number (this will be your login ID) and ensure it is active for OTP verification.
- Add an alternate mobile number (optional) for backup communication.
- Provide a valid email ID for login and important communication.
- Add an alternate email ID (optional) if available.
- Enter your Class X Board Examination Roll Number for identification purposes.
- Choose and answer security questions for account recovery.

After Filling all Details Click "Submit button". You will see Next page
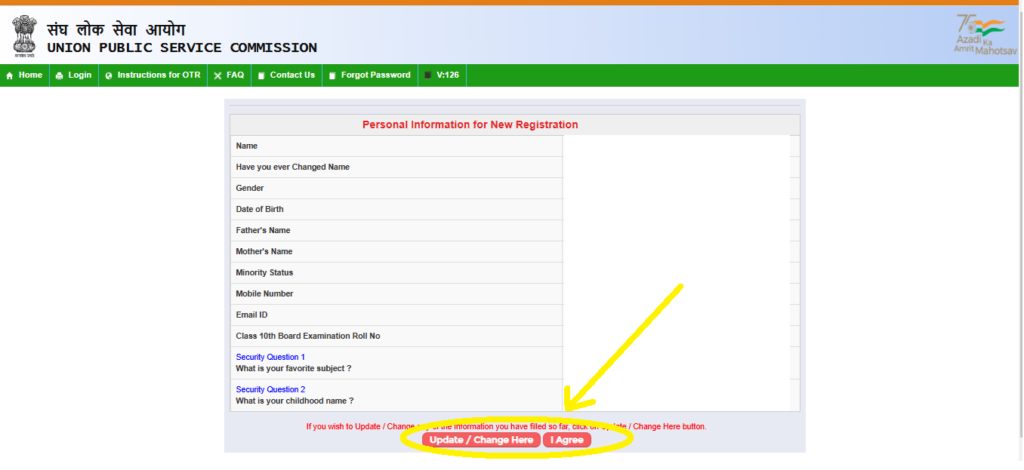
Step 3: Verify and Agree
- After filling in all the required details, carefully review your personal information displayed on the screen.
- Check the following fields to ensure accuracy:
- Name
- Date of Birth
- Gender
- Father's and Mother's Names
- Class 10th Board Examination Roll Number
- Mobile Number and Email ID
- Responses to Security Questions
- If you need to make any corrections, click on the "Update/Change Here" button.
- Once you are satisfied with the entered details, click on the "I Agree" button to confirm and proceed.
- This step finalizes your personal information, so ensure everything is accurate before submission.
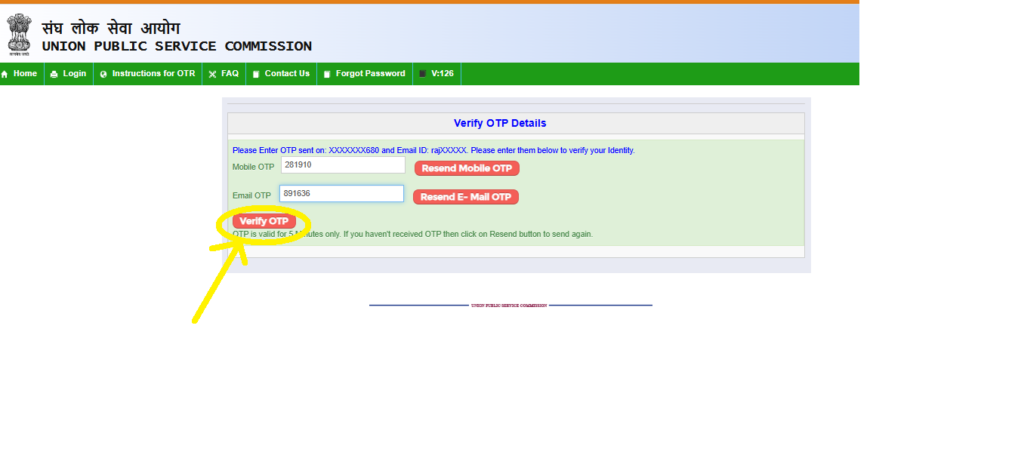
Step 4: Verify OTP
- After agreeing to the details in Step 3, you will be prompted to verify your identity using an OTP.
- Check the Mobile Number and Email ID you provided during registration:
- An OTP will be sent to both your registered mobile number and email ID.
- Enter the OTPs in the respective fields:
- Mobile OTP: Enter the OTP received on your mobile number.
- Email OTP: Enter the OTP sent to your email ID.
- Click on the "Verify OTP" button to proceed.
- If you haven’t received the OTP:
- Click on "Resend Mobile OTP" or "Resend E-Mail OTP" to generate a new OTP.
- Ensure you complete the verification within 5 minutes, as the OTP is time-sensitive.
Once successfully verified, you will proceed to the next step to complete your One Time Registration (OTR).
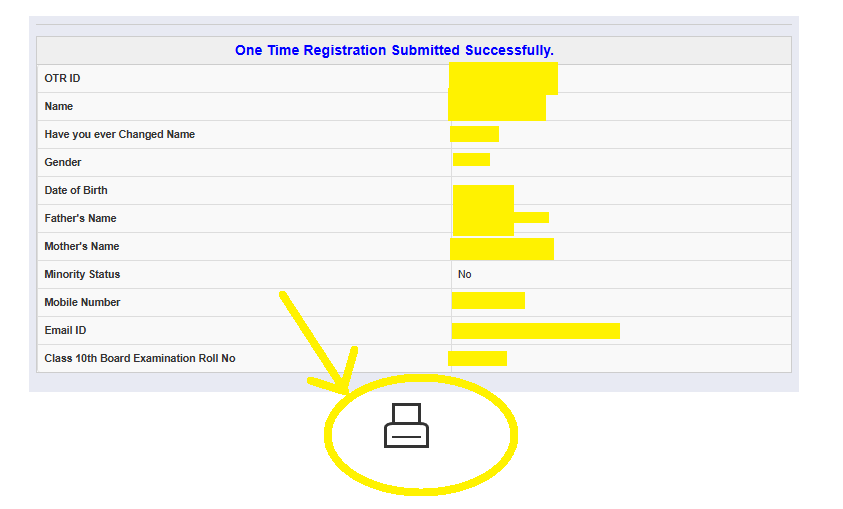
Step 5: Registration Confirmation
- After successfully verifying the OTP, your One Time Registration (OTR) will be submitted, and a confirmation page will appear.
- This confirmation page contains all the details you provided during the registration process, such as:
- OTR ID: Your unique registration ID (e.g., 125000000607857).
- Name, Date of Birth, Gender, and Parent's Names.
- Mobile Number and Email ID.
- Class 10th Board Examination Roll Number.
- Review the information displayed on the screen to ensure everything is correct.
- Save or print this confirmation page for future reference. Use the printer icon displayed at the bottom to generate a hard copy if needed.
- Your OTR ID will also be sent to your registered email and mobile number.
This completes your One Time Registration (OTR). Use your OTR ID to log in and apply for examinations like the UPSC Civil Services Examination 2025.
Completing Your OTR Profile
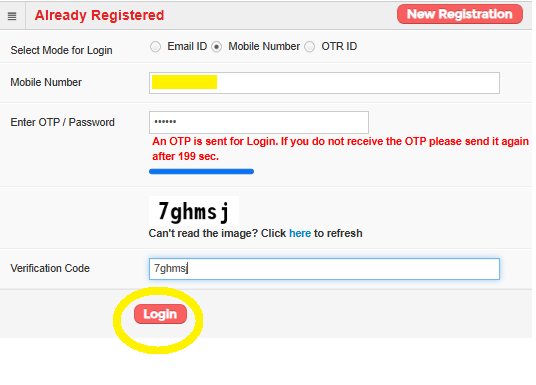
Step 6: Login After Registration
- Visit the UPSC OTR Login Page at https://upsconline.gov.in.
- Select the Login Mode:
- Choose from Email ID, Mobile Number, or OTR ID (used during registration).
- Enter the corresponding login credential:
- If using a mobile number, ensure it is the same as the one provided during registration.
- Click on the "Get OTP" button.
- An OTP will be sent to your registered mobile number or email ID, depending on your login mode.
- Enter the OTP in the required field and input the Verification Code shown on the screen.
- Click "Login" to access your OTR account.
Once logged in, you can proceed to apply for various UPSC examinations, manage your details, or check notifications.
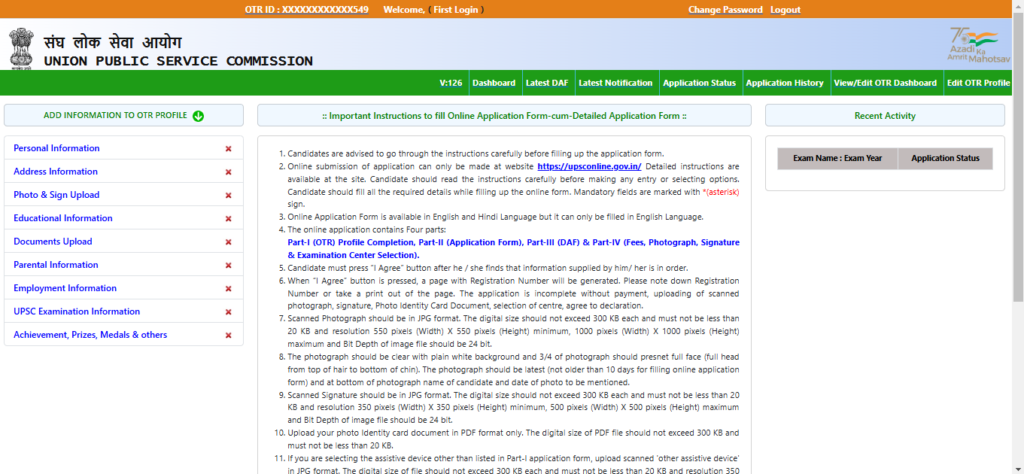
Step 7: Complete Your OTR Profile
- Once logged in, you will see the OTR Dashboard. Click on the "Add Information to OTR Profile" button.
- Fill in the following sections one by one:
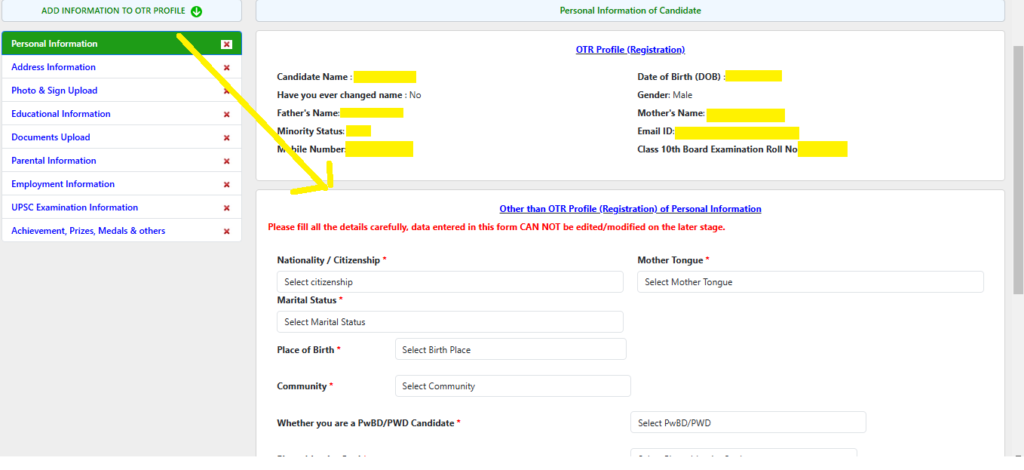
- Personal Information: Confirm and update your personal details, if required.
- Address Information: Provide your current and permanent address details.
- Photo & Signature Upload: Upload a clear photograph and signature as per the guidelines:
- Photograph size: Between 20 KB and 300 KB, resolution 550x550 to 1000x1000 pixels.
- Signature size: Between 10 KB and 300 KB, resolution 350x350 to 500x500 pixels.
- Educational Information: Add your educational qualifications (Class X, XII, Graduation, etc.).
- Parental Information: Input details of your parents.
- Employment Information (if applicable): Provide employment details, if you're working.
- Documents Upload: Upload required documents such as ID proof in PDF format.
- Achievements: Mention any prizes, awards, or medals received.
- Review all the details entered in each section and ensure accuracy.
- Click "Save" or "Submit" for each section to save the information.
- After completing all sections, confirm your details by clicking "I Agree".
Important Notes:
- Ensure uploaded files meet the size and format requirements.
- All mandatory fields are marked with an asterisk (*).
- Save your progress regularly to avoid data loss.
Once your profile is complete, you can proceed to apply for any UPSC examination.
Step 8: Fill in Additional Personal Information
- Nationality and Citizenship:
- Select your nationality from the dropdown menu (e.g., Indian).
- Marital Status:
- Choose your marital status (e.g., Single, Married).
- Place of Birth:
- Select your place of birth, including district and state.
- Community:
- Choose your community (General, SC, ST, OBC, etc.).
- PwBD/PWD Status:
- Specify if you are a PwBD/PWD candidate and select the applicable category if relevant.
- Mother Tongue:
- Enter your mother tongue from the dropdown menu.
Step 9: Fill in Address Information
- Correspondence Address:
- Enter your complete correspondence address, including:
- House Number/Apartment/Building/Street/Village.
- Post Office: Avoid using special characters or numeric values.
- City and District: Ensure accurate selection.
- State: Select your state from the dropdown menu.
- Pincode: Enter a valid 6-digit postal code.
- Area Code and Phone (optional): Add your area code and phone number if applicable.
- Enter your complete correspondence address, including:
- Permanent Address:
- If your permanent address is the same as the correspondence address, check the box "Click here if your Permanent postal address is same as Correspondence address".
- If different, fill in the permanent address details similarly.
- Save Your Information:
- After entering all the details, review them carefully to ensure accuracy.
- Click the "Save" button t
Step 10: Upload Photo and Signature
- Photo Upload:
- Click on the "Upload Photo" button.
- Ensure your photograph meets the specified criteria:
- Format: JPG/JPEG.
- Size: Typically between 20 KB to 300 KB.
- Dimensions: Usually 350x350 pixels (width x height) or similar.
- Background: White or light-colored background.
- Clarity: Clear, recent, and front-facing.
- Browse and select your photo file from your computer.
- Click "Upload" and then "Save" after successful upload.
- Signature Upload:
- Click on the "Upload Signature" button.
- Ensure your signature image meets the specified criteria:
- Format: JPG/JPEG.
- Size: Typically between 10 KB to 300 KB.
- Dimensions: Usually 350x350 pixels (width x height) or similar.
- Clarity: Clear signature on a white paper.
- Browse and select your signature file.
- Click "Upload" and then "Save" after successful upload.
Step 11: Upload Identity Proof (if required)
- Depending on the examination, you might be required to upload a scanned copy of your Identity Proof (e.g., Aadhaar Card, Voter ID, PAN Card, Passport, Driving License).
- Follow the instructions for format, size, and dimensions similar to photo/signature upload.
- Upload the document and save.
Step 12: Final Review and Declaration
- After uploading all necessary documents, a comprehensive preview of your OTR application will be displayed.
- Review all details carefully: Check your personal information, address, educational qualifications, photo, and signature.
- If any corrections are needed, use the "Edit" option to modify the respective sections.
- Once satisfied, read the declaration statement.
- Check the box indicating your agreement to the declaration.
- Click on the "Final Submit" button.
- Important: After final submission, you generally cannot make further changes to your OTR profile.
Step 13: Print/Download OTR Confirmation
- Upon successful final submission, a confirmation page will appear.
- It is highly recommended to download and print a copy of your OTR confirmation page for future reference. This page will contain your OTR ID.
Important Points to Remember for UPSC OTR 2025
- One-Time Registration: OTR is a one-time process. Once registered, you can use the same OTR ID for all future UPSC examinations.
- Accuracy is Key: Ensure all details entered are accurate and match your official documents. Discrepancies can lead to rejection at later stages.
- Keep Credentials Safe: Remember your OTR ID and password. These are crucial for accessing your profile and applying for examinations.
- Correction Window: UPSC usually provides a correction window for OTR details. Keep an eye on official notifications for such opportunities.
- Mobile Number & Email: Use an active mobile number and email ID as all communications from UPSC will be sent to these.
Q1: What is UPSC OTR?
A1: UPSC OTR (One Time Registration) is a facility provided by the Union Public Service Commission (UPSC) to simplify the application process for various examinations. Candidates register once with their basic details, and this profile can then be used for all future UPSC applications, saving time and effort.
Q2: Is OTR mandatory for all UPSC examinations?
A2: Yes, OTR is mandatory for applying to any examination conducted by UPSC. Without a valid OTR ID, you cannot proceed with the application for any specific examination.
Q3: Can I edit my OTR details after final submission?
A3: Generally, after final submission of the OTR profile, major details cannot be changed. However, UPSC usually provides a specific correction window for minor edits. It's crucial to check official notifications for details regarding correction windows.
Q4: What documents are required for OTR registration?
A4: For OTR, you primarily need personal details, educational qualifications, a scanned photograph, and a scanned signature. Depending on the exam, identity proof might also be required later during the specific exam application.
Q5: What if I forget my OTR ID or password?
A5: On the UPSC OTR portal, there are options like "Forgot OTR ID" and "Forgot Password." You can retrieve them by providing your registered email ID, mobile number, or security questions.
Practice Questions for UPSC Aspirants
-
Which of the following is a mandatory requirement for UPSC One Time Registration (OTR)?
- Payment of application fee.
- Uploading of caste certificate.
- A valid email ID and mobile number.
- Submission of a detailed resume.
Correct Answer: c) A valid email ID and mobile number.
-
What is the primary benefit of UPSC's One Time Registration (OTR) system?
- It allows candidates to apply for multiple exams simultaneously without separate applications.
- It simplifies the application process by requiring basic details only once for all future exams.
- It reduces the application fee for subsequent examinations.
- It provides instant results for preliminary examinations.
Correct Answer: b) It simplifies the application process by requiring basic details only once for all future exams.
About LearnPro Editorial Standards
LearnPro editorial content is researched and reviewed by subject matter experts with backgrounds in civil services preparation. Our articles draw from official government sources, NCERT textbooks, standard reference materials, and reputed publications including The Hindu, Indian Express, and PIB.
Content is regularly updated to reflect the latest syllabus changes, exam patterns, and current developments. For corrections or feedback, contact us at admin@learnpro.in.